


经过我反复测试,安装肯定没问题了,只有你一步步按部就班
一丶suricata安装
1、虚拟机安装 vmware
YG5H2-ANZ0H-M8ERY-TXZZZ-YKRV8
虚拟网卡配置 nat模式
2、linux系统安装 centos7.9
输入字母“I”进入编辑模式wq保存
新建centos镜像、分配资源、启动安装、修改ip
静态的 static 动态的dhcp
cd /etc/sysconfig/network-scripts/
中文https://www.osgeo.cn/suricata/index.html
英文https://suricata.readthedocs.io/en/latest/
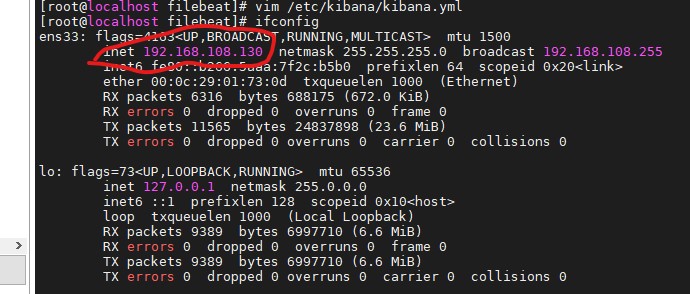
ifconfig命令无效
打开网卡设置
vi /ets/sysconfig/network-scripts/ifcfg-ens33
no改为yes
onboot=yes
网络工具
yum install net-tools
重启
service network restart
ifconfig
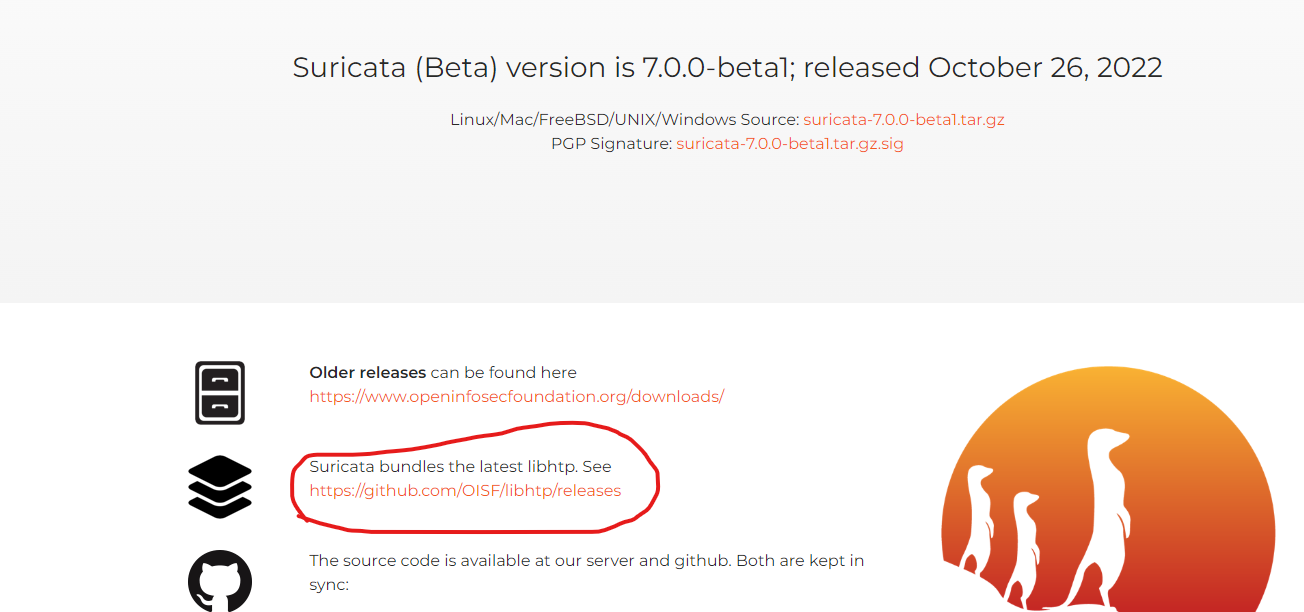
(1) 准备suricata6.0安装包和最新libhtp安装包
suricata:
链接:https://pan.baidu.com/s/1DU4guHU2K7NnUJ9vjXKDeA
提取码:zk9l
libhtp:https://suricata.io/download/
把两个文件拖到/home目录下(文件名以自己为主,例如suricata-master-6.0.x)
yum install unzip
cd /home
unzip suricata
unzip libhtp
(2) 安装依赖 比如基础网络数据包动态库、rust语言支持、yaml配置文件支持、gcc编译器
yum install epel-release
yum -y install \
      autoconf \
      automake \
      cargo \
      diffutils \
      gcc \
      gcc-c++ \
      jansson-devel \
      jq \
      lua-devel \
      libtool \
      python-distutils-extra \
      libpcre3 \
      libpcre3-dbg \
      libpcre3-dev \
      libyaml-devel \
      build-essential \
      libnet1-dev \
      libyaml-0-2 \
      libyaml-dev \
      zlib1g \
      zlib1g-dev \
      libcap-ng-dev \
      libcap-ng0 \
      libmagic-dev \
      libjansson-dev \
      libjansson4 \
      libnss3-dev \
      libnspr4-dev \
      pkg-config \
      libnet-devel \
      libcap-ng-devel \
      libmaxminddb-devel \
      libpcap-devel \
      lz4-devel \
      make \
      pcre-devel \
      pkgconfig \
      sudo \
      which \
      zlib-devel \
      rustc cargo \
      file-devel \
      nspr-devel \
https://www.cnblogs.com/fxbin/p/11854345.html镜像源更新方法
cp libhtp -rf ./suricata 把libhtp放入suricata中
(3) 安装libhtp
cd /home/suricata mv libhtp-0.5.41 libhtp 改名 cd libhtp sh autogen.sh 生成配置文件 ./configure 配置 make 编译 make install 安 装 libhtp放到suricata目录下 动态库拷贝到lib64下 /home/suricata/libhtp/htp/.libs/ 目录 cp /home/suricata/libhtp/htp/.libs/libhtp.so.2 /usr/lib64 拷贝
(4) 安装suricata
cd /home/suricata sh autogen.sh 生成配置文件 ./configure 配置 错误:遇到的问题、缺少rust编译环境 export $(cat /root/proxy) 先执行,要不后面命令安装不下来 cargo install --force cbindgen 警告问题解决: find / -name cbindgen 查找文件 export PATH=$PATH:/root/.cargo/bin 重新执行一遍 sh autogen.sh ./configure 配置 make 编译 make install 安 装 cd ./src/.libs/
显示suricata就安装成功
(5) suricata规则库升级
yum install python-pip pip install --upgrade pip 需要手动更新,看下面 pip install --upgrade setuptools pip install suricata-update pip3 install --upgrade pip
(6)pip更新失败如何手动更新pip:
手动下载pip20的Python安装包 cd /home/suricata/ yum install wget wget https://files.pythonhosted.org/packages/0b/f5/be8e741434a4bf4ce5dbc235aa28ed0666178ea8986ddc10d035023744e6/pip-20.2.4.tar.gz 解压 tar -xvf pip-20.2.4.tar.gz cd /home/suricata/pip-20.2.4 python setup.py install 升级 pip install -U pip 问题解决看下
(7) Python2升级python3**
安装依赖
yum install zlib-devel bzip2-devel openssl-devel ncurses-devel sqlite-devel readline-devel tk-devel  gcc  libffi-devel -y
下载安装包
wget -P /home/software https://www.python.org/ftp/python/3.9.6/Python-3.9.6.tar.xz
解压
cd /home/software
tar xf  Python-3.9.6.tar.xz
创建目录
mkdir /usr/local/python3.9.6
编译安装
cd /home/software/Python-3.9.6
./configure --prefix=/usr/local/python3.9.6 && make && make install
确实环境变量
export PATH=$PATH:/usr/local/python3.9.6/bin
修改旧版链接文件
mv /usr/bin/python /usr/bin/python2.7.2
mv /usr/bin/pip /usr/bin/pip2.7.2
设置新版Python链接,建立软连接指向默认的python的Bin目录
ln -s /usr/local/python3.9.6/bin/python3.9 /usr/bin/python
ln -s /usr/local/python3.9.6/bin/pip3.9 /usr/bin/pip
修改yum命令的配置文件(yum命令默认为Python2来执行),这里需要修改两个配置文件/usr/bin/yum 和 /usr/libexec/urlgrabber-ext-down
#!/usr/bin/python  修改为 #!/usr/bin/python2.7.2
https://blog.csdn.net/QIU176161650/article/details/118784155
软连接失败参数加f,备份和软连接改成2.7.2和3.9.6,为了防止原文件存在,导致覆盖,
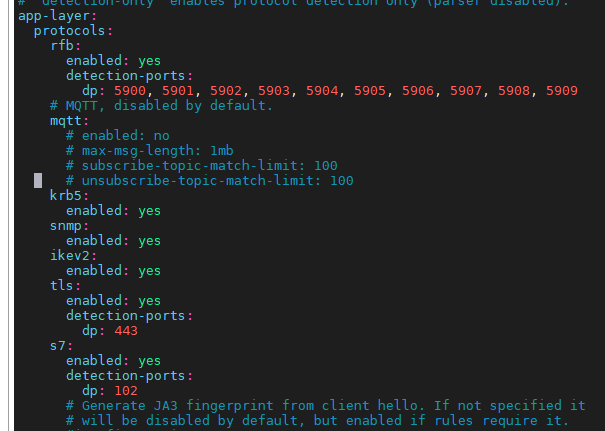
(8)代码如何增加一个协议,修改suricata.yaml 文件
vim /home/suricata/suricata.yaml app-layer: 增加s7,outputs:增加s7
cd /home/suricata
python3 ./scripts/setup-app-layer.py S7
cp suricata.yml ../ 备份 重新编译 make make install
(9)启动suricata,回放数据包(指定配置文件和抓取包)pacp为wireshark抓取,看后面教程
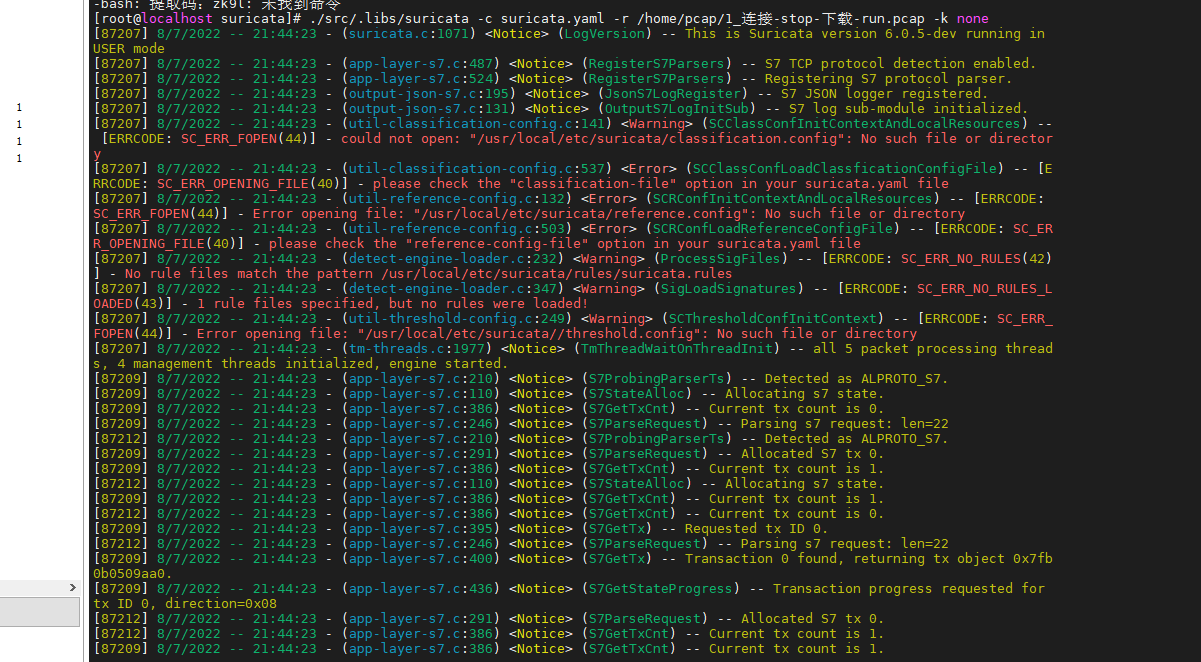
./src/.libs/suricata -c suricata.yaml -r /home/pcap/s7_0a.pcap -k none ./src/.libs/suricata -c suricata.yaml -r /home/pcap/1_连接-stop-下载-run.pcap -k none tcpreplay -i em2 /home/atd/imap_1.pcap
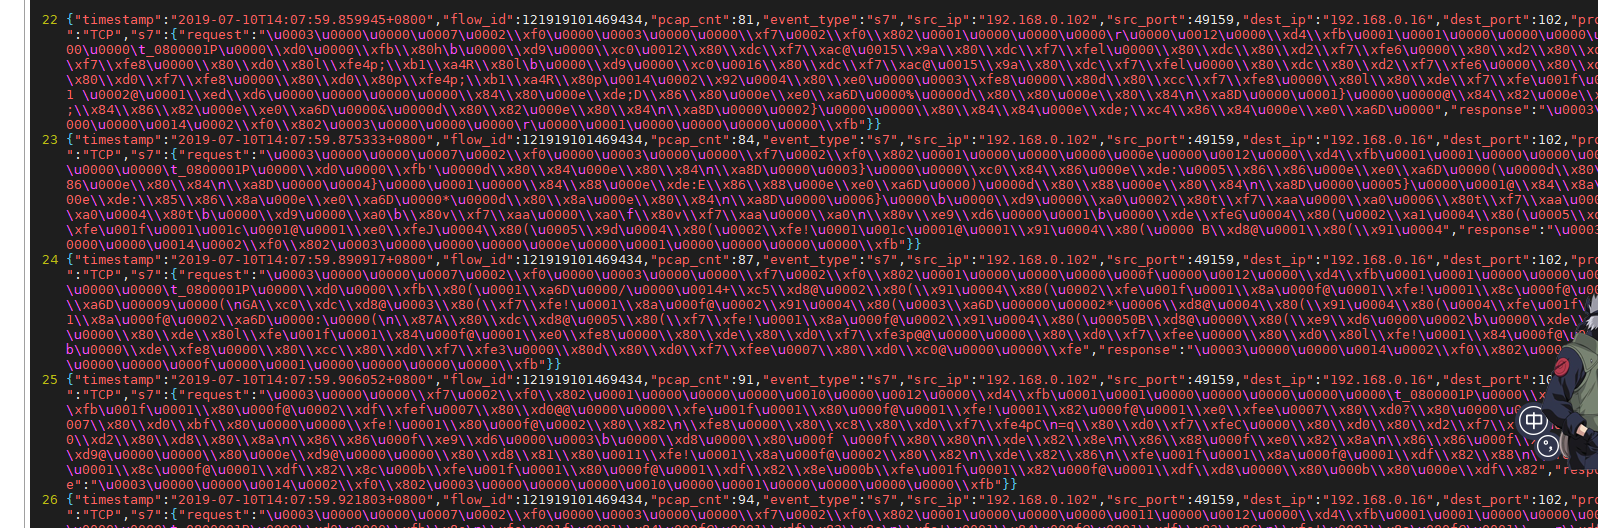
生成eve.json文件(/home/suricata/eve.json)
(10)启动suricata(指定配置文件和规则)
例如新建一条规则
vim /home/suricata/rules/test.rules
写一条百度规则
alert http any any -> any any (msg:"hit baidu.com...";content:"baidu"; reference:url, www.baidu.com;)
vim /home/suricata/suricata.yaml
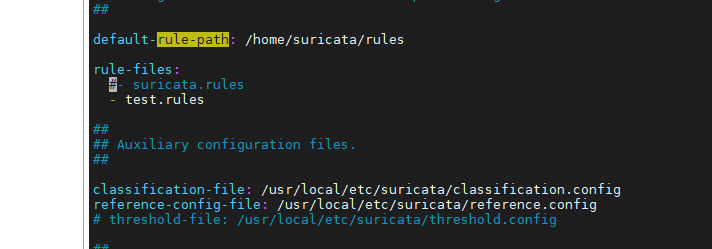
虽然说可以-s指定规则路径,但是容易出错
suricata -c /home/suricata/suricata.yaml -i eth0
ping www.baidu.com
查看日志
vim /usr/local/var/log/suricata/fast.log
vim /usr/local/var/log/suricata/eve.json

二丶elk安装
关闭防火墙
firewall-cmd --state
systemctl stop firewalld
1安装jdk
sudo yum install -y java-1.8.0-openjdk

Java -version
2官方秘钥
rpm --import <https://artifacts.elastic.co/GPG-KEY-elasticsearch
3仓库
vim /etc/yum.repos.d/elasticsearch.repo
写入
[elasticsearch-6.x]

name=Elasticsearch repository for 6.x packages

baseurl=https://artifacts.elastic.co/packages/6.x/yum

gpgcheck=1

gpgkey=https://artifacts.elastic.co/GPG-KEY-elasticsearch

enabled=1

autorefresh=1

type=rpm-md
4 elk默认安装在/etc 目录下
yum install -y elasticsearch

vim /etc/elasticsearch/elasticsearch.yml

放开注释

network.host: localhost

Port:9200
设置自启动
systemctl start elasticsearch

systemctl enable elasticsearch

systemctl status elasticsearch

查看是否正常安装
curl -X GET "localhost:9200"
ps aux|grep elastic
5安装kibana
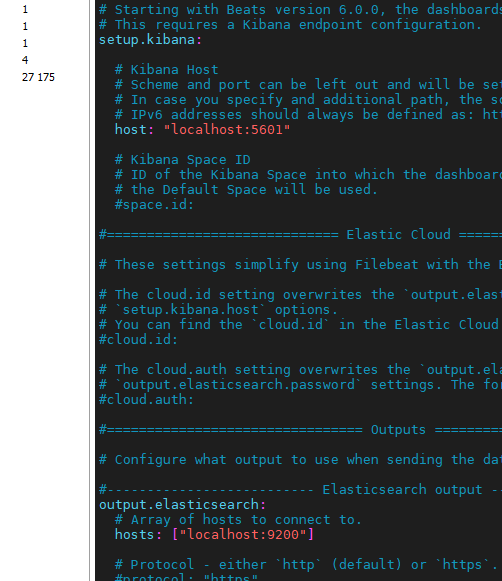
yum install -y kibana

vim /etc/kibana/kibana.yml
放开注释
或者修改为本地ip
Kibana显示中文
最后一行EN改为zh-CN,去注释

保存配置启动
systemctl start kibana

systemctl enable kibana

systemctl status kibana

netstat -nltp|grep 5601
6安装logstash
 分别写输入输出
 vim /etc/logstash/conf.d/02-beats-input.conf

 vim /etc/logstash/conf.d/30-elasticsearch-output.conf
yum install -y logstash

vim /etc/logstash/conf.d/02-beats-input.conf
写入
input
{
 file
 {
    path => ["/home/suricata/eve.json"]
    codec => "json"
    type => "SuricataAlert"
    start_position => "beginning"
    sincedb_path => "/dev/null"
 }
}

vim /etc/logstash/conf.d/30-elasticsearch-output.conf
output
{
   elasticsearch
   {
   hosts => ["127.0.0.1:9200"]
   index => "suricata-%{+YYYY.MM.dd}"
   }
   stdout {codec => rubydebug}
}
查看配置文件是否正确

sudo -u logstash /usr/share/logstash/bin/logstash --path.settings /etc/logstash -t
 systemctl start logstash

 systemctl enable logstash

 systemctl status logstash
7 启动suricata抓包:
./src/.libs/suricata -c suricata.yaml -r /home/testtcp02.pcap -k none
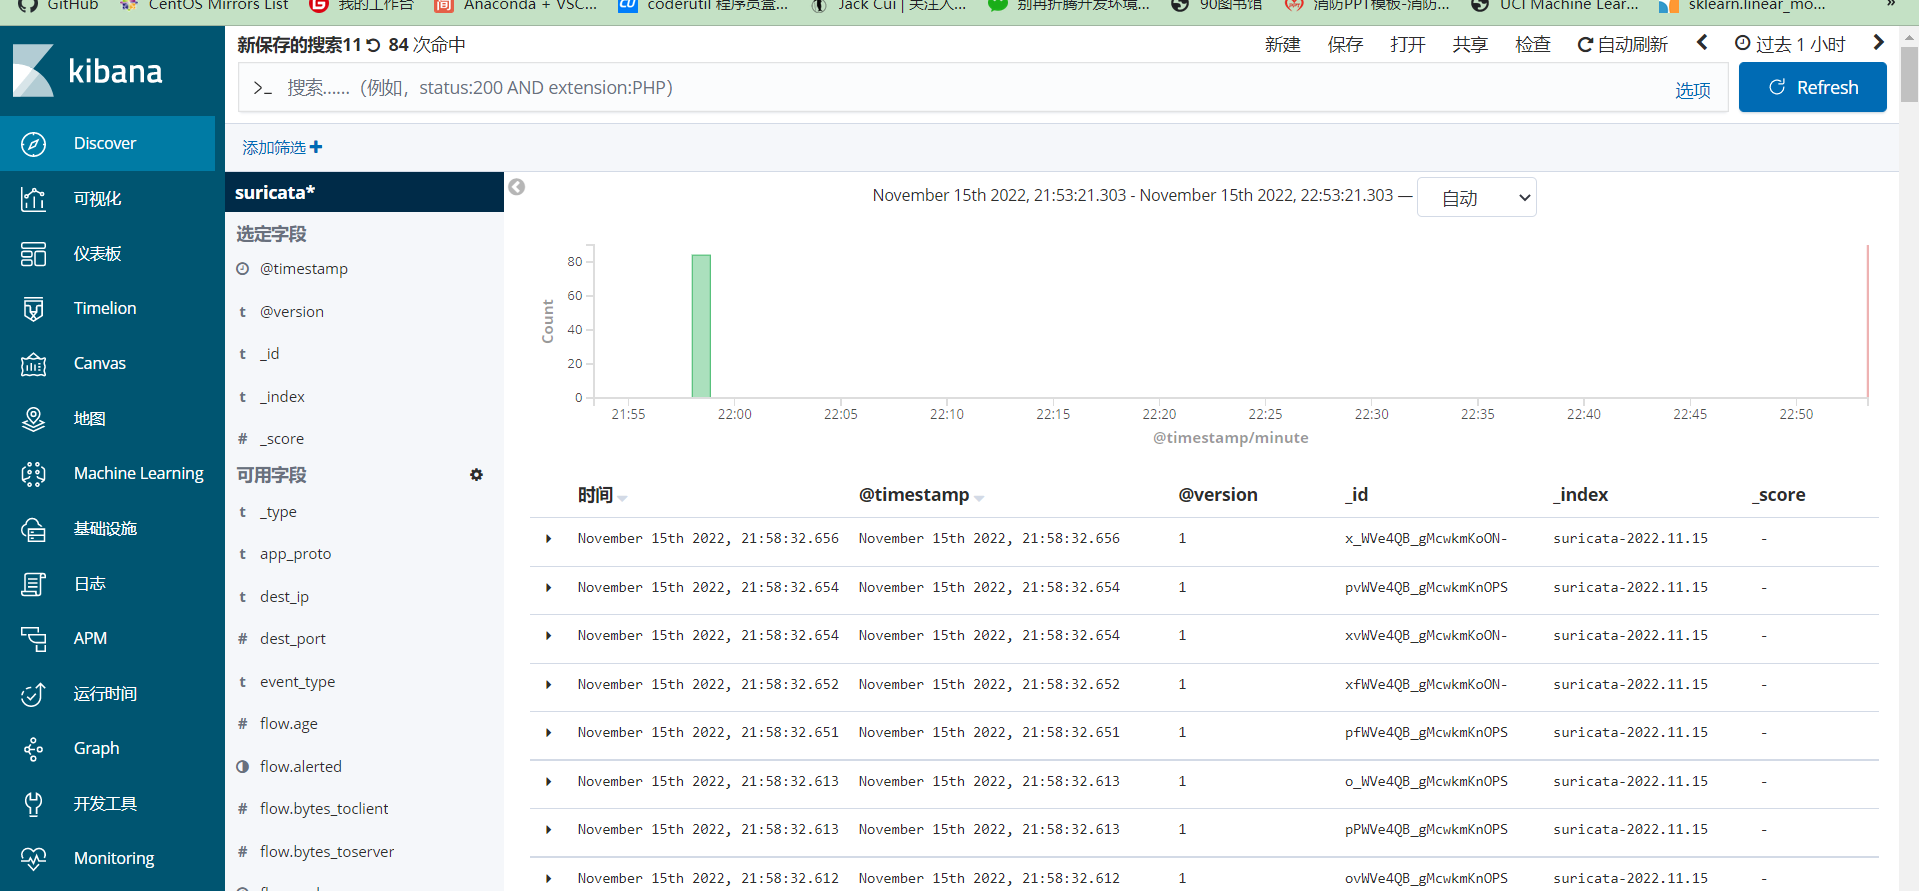
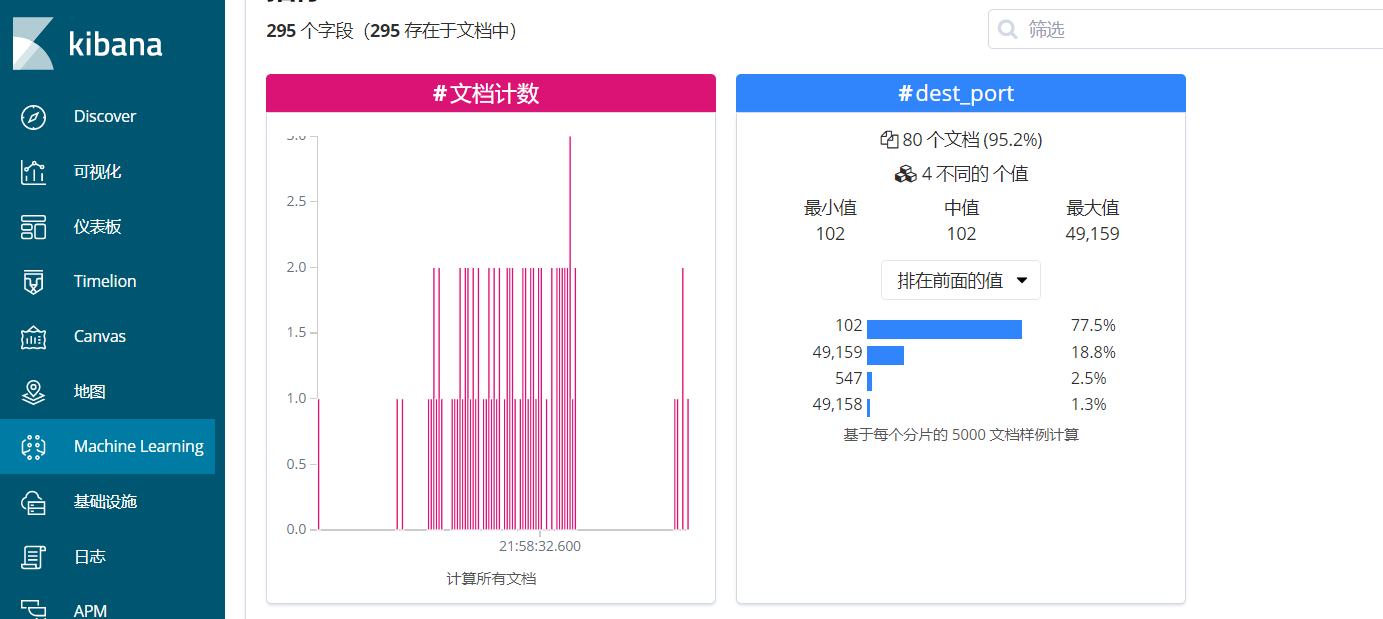
suiricata目录下生成eve.json文件,传入logstash过滤输出,在到elasticsearch检索传入kibana看板
打开http://192.168.108.130:5601/
8 可选Wireshark远程抓包(如果本地直接选择WLAN就行)
Linux下安装启动rpcapd
如果远程抓包的机器是linux,需要安装rpcapd,以便让 Wireshark 连接该服务器,安装方法如下:
a) 安装相应依赖
yum install glibc-static gcc flex byacc -y
b) 下载rpcapd安装包,也可以官网下载
cd /home

wget http://www.winpcap.org/install/bin/WpcapSrc_4_1_2.zip

unzip WpcapSrc_4_1_2.zip
c) 编译rpcapd
cd ./winpcap/wpcap/libpcap

chmod +x configure runlex.sh

CFLAGS=-static ./configure

make

cd rpcapd

make

yum install glibc-static
d) 运行服务
./rpcapd -n
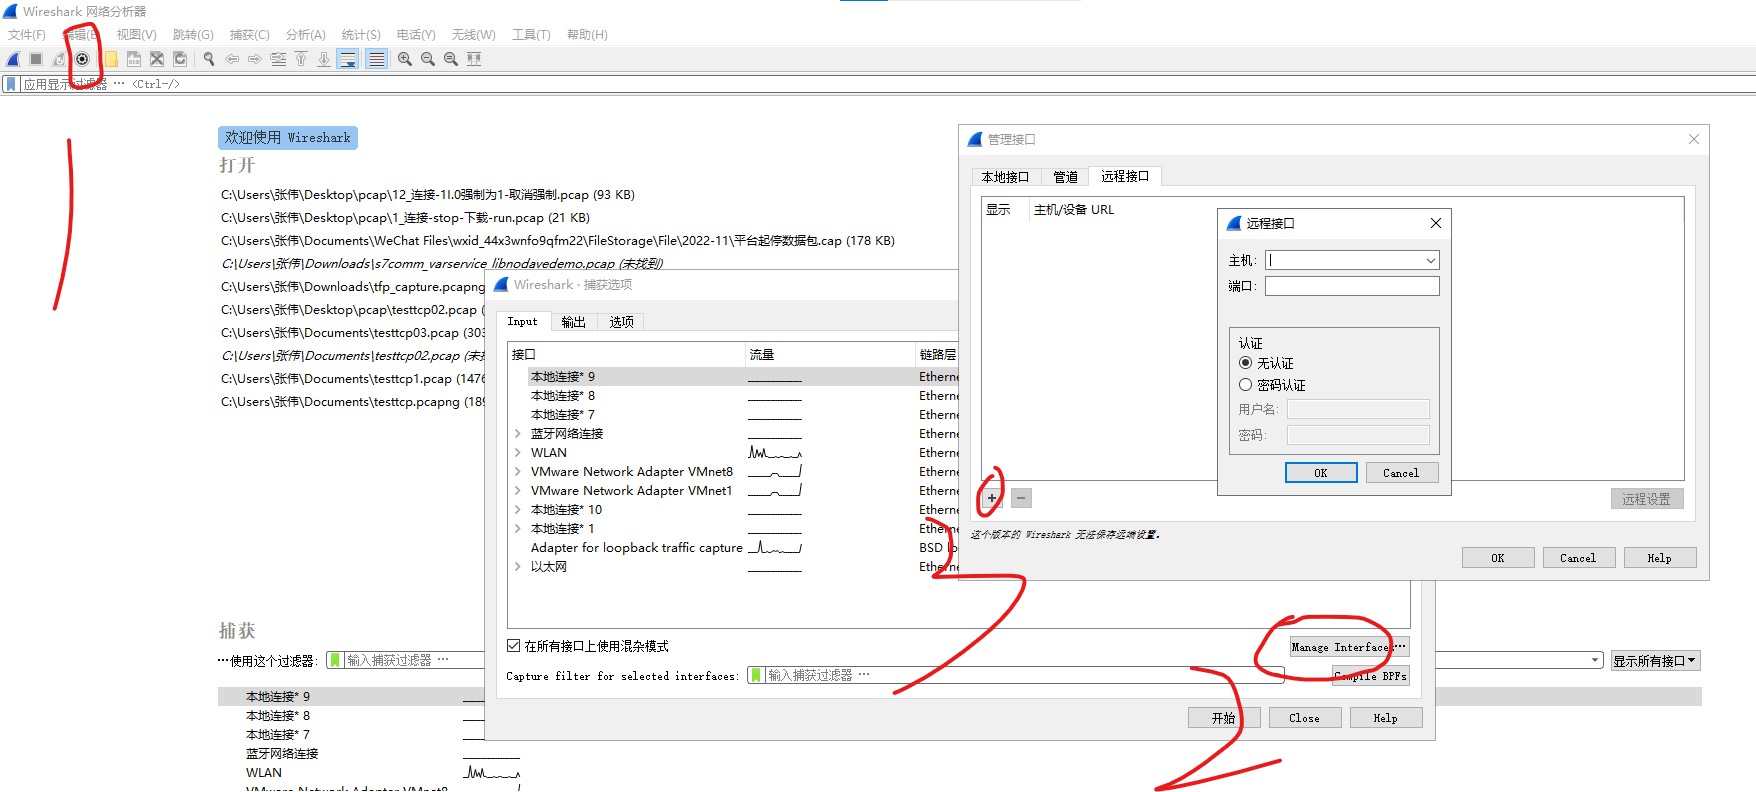
填写服务器ip,用户名,远程登录密码,端口不用填,就连接上了
三丶演示
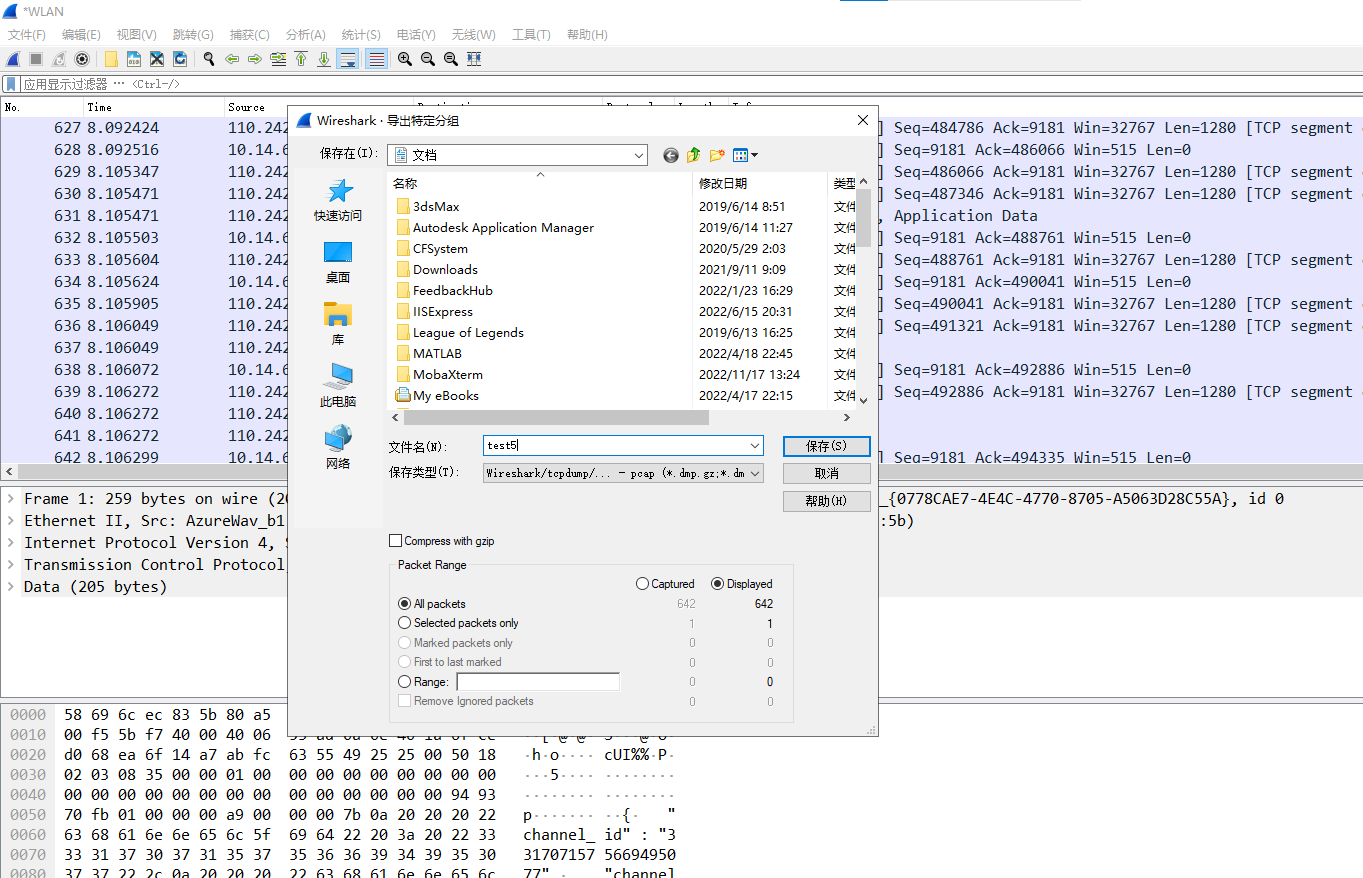
抓包(文件=》导出特定分组=》选择pcap格式)
默认导出所有,下面range可以选择导出指定大小比如1,3,5, 或者 1-100
启动
./src/.libs/suricata -c suricata.yaml -r /home/pcap/1_连接-stop-下载-run.pcap -k none
查看生成的json文件
vim /home/suricata/eve.json
扩展:
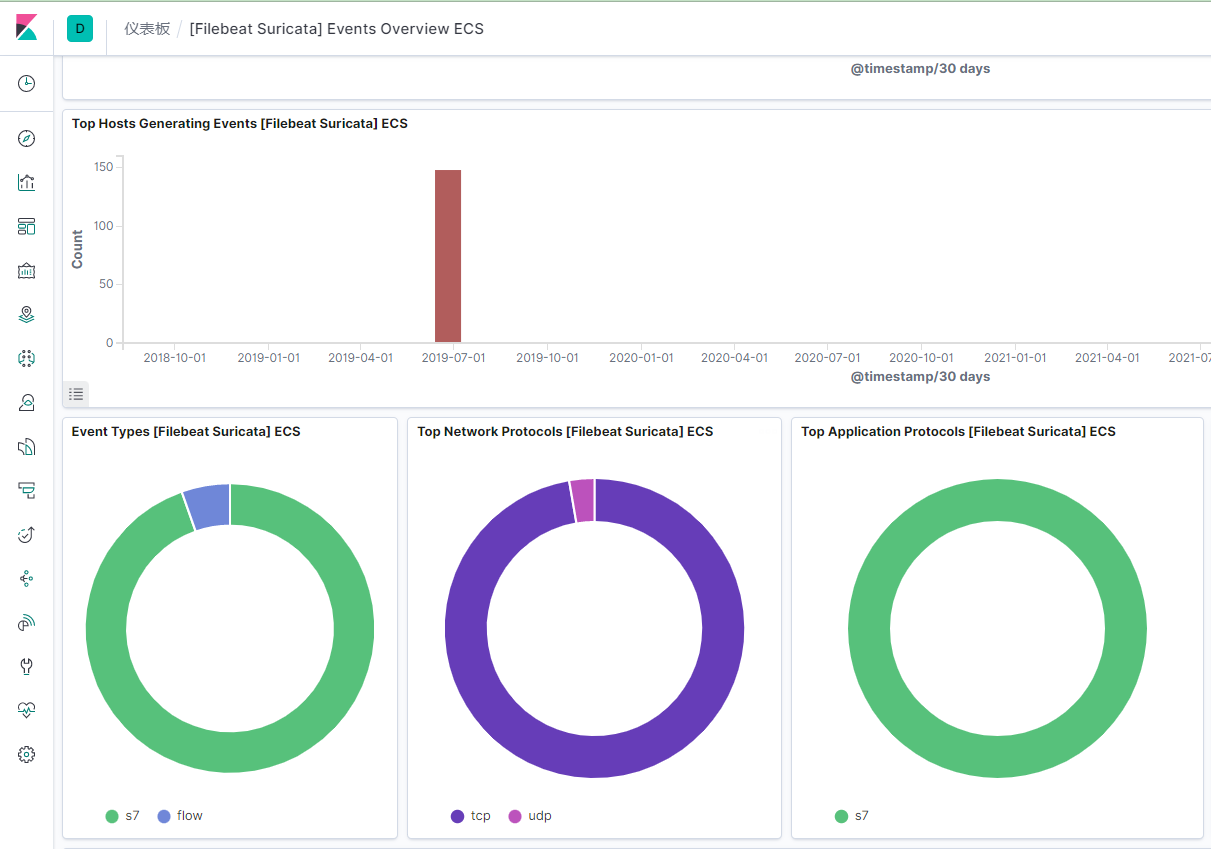
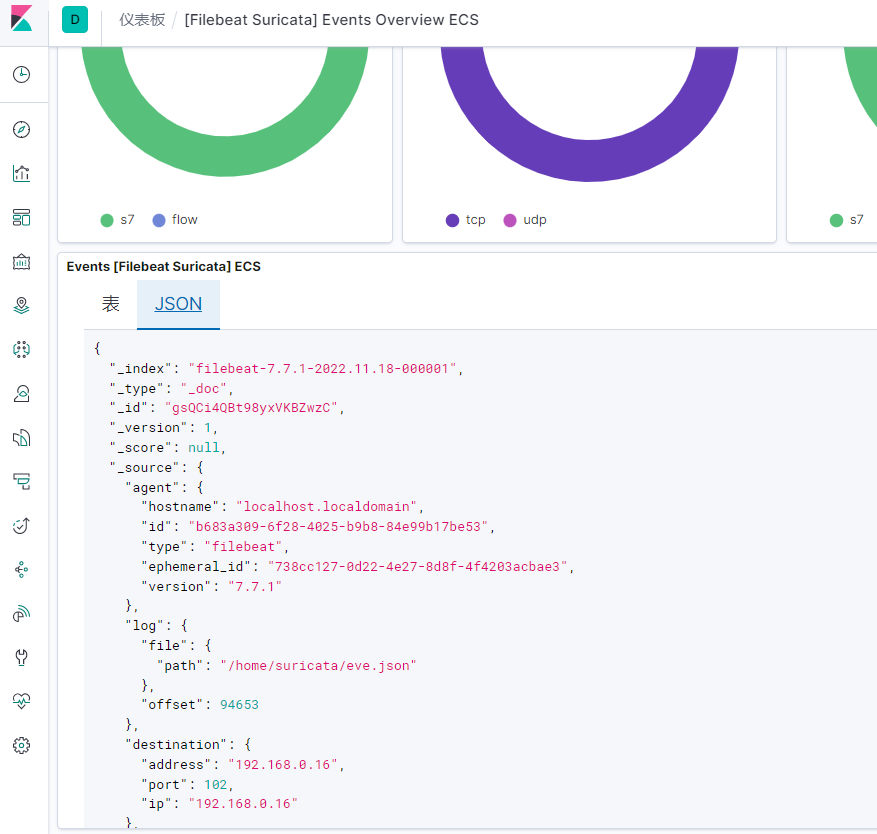
filebeat拥有suricata模块可以显示日志,安装如下
首先不用logstash,直接从filebeat传入logstash,禁用logstash
yum install -y filebeat

filebeat modules enable suricata

vim /etc/filebeat/filebeat.yml
vim /etc/filebeat/modules.d/suricata.yml

filebeat setup
service filebeat start

 systemctl start filebeat

 systemctl enable filebeat

 systemctl status filebeat

评论